
Well, I have been at it again the past week or two.
Honestly, I’ve been pretty busy lately with some consulting work. Who knew this could be so much fun!? I’ve met a few new people and seen some awesome houses that need a little love. I’ve helped pick colors, new furniture and new window treatments. I’ve looked for new bathroom fixtures, vanities, and lighting. I’ve even had the chance to do some full room designs. THANK YOU! To all of you who have trusted me with making decisions in your homes. It’s been a blast!
Even though I’ve been a little busy with these things, I’m never too busy to start a new little project in our own house! 🙂
Enter the good ole guest bathroom. Most people have a guest room/guest bathroom that are rarely used, but not us. We’re fortunate enough to get a lot of use out of them. All of our family is out of town. We have friends passing through for a night or two often. This space has housed a few college students during the summer time. And we use it for respite foster placements. So, the room is basically a revolving door, and I have learned to clean and swap the sheets out fast for the next guest!
That being said, this bathroom did not actually “need” a facelift. It was clean, in great condition, and functional. But it is also a small space where I could experiment with a few new things without committing to anything in a main spot in the home.
I was helping a friend add custom, framed mirrors and shelving in her bathroom where she had installed some awesome black and white tile. This tile wound up inspiring this entire project! I saw it and just couldn’t get it off my mind. I had wondered about painting and stenciling tile, had read some blogs on it, but just wasn’t sure about how it would hold up.
So I started looking into it more and found this product that seemed to have rave reviews. It’s a tub and tile epoxy paint and it has changed my life. Maybe not my life, just my bathroom. Let’s not be overly dramatic here. Haha.
Here is the blog that I found to be most helpful in doing this. She gives good details. She uses this paint in a high traffic bathroom. And the hold up over a few years has been great. So I’ll give you a quick walk through of how I did it, but you can check out her blog if you want more detailed information.
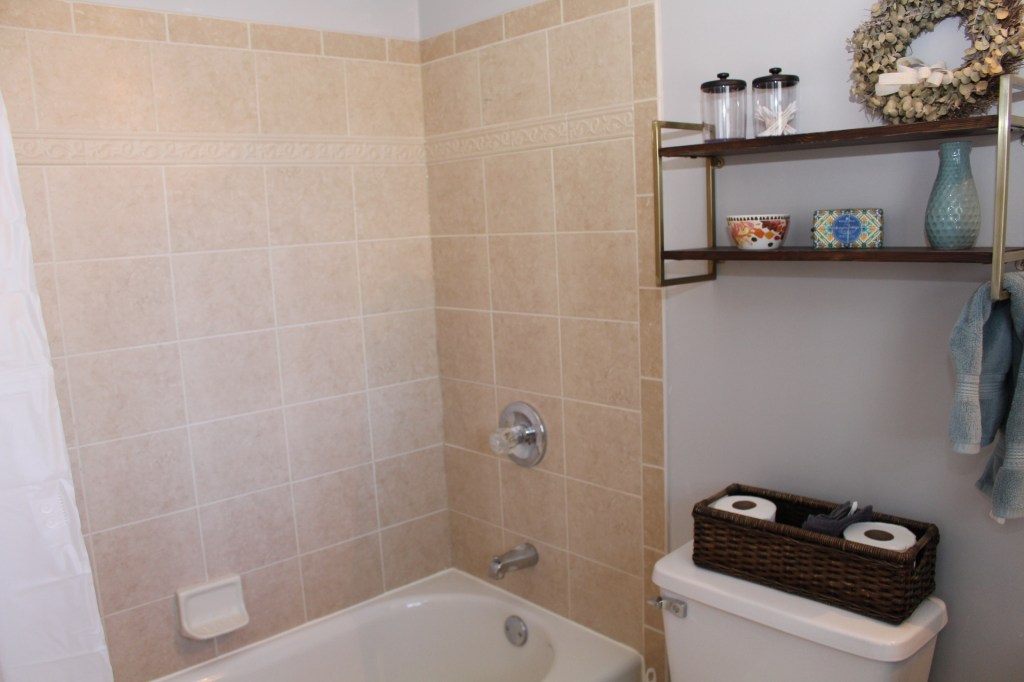
But wait, I forgot to show you the most important part. The before pictures, of course.


 I think the most important part of this was the prep work. First things first, clean the tile like you’ve never cleaned it before. You wanna get all the residue, soap scum, etc. off so that the paint will actually stick. I used Comet and an abrasive sponge. And scrubbed. And scrubbed. Then it rinse thoroughly and let it dry completely. You also have to remove any and all caulk. The paint won’t stick to this, and over time it can peel up on the caulk. Not a problem that can’t be fixed, but a nuisance to have to go back and fix it a year later. Might as well do it right the first time, right? (I sound like my dad!) Once all the caulk is removed you are ready to paint.
Oh, I almost forgot. YOU NEED TO PURCHASE THIS MASK. The kids call it my monster mask. 🙂 Seriously you will not be able to breathe without it. The paint smells so terrible and so strong. So open up all the windows. Turn on all the fans. And put your monster mask on. Ok, now you are really ready to paint. And ready to lose some brain cells. Just keepin’ it real, folks.
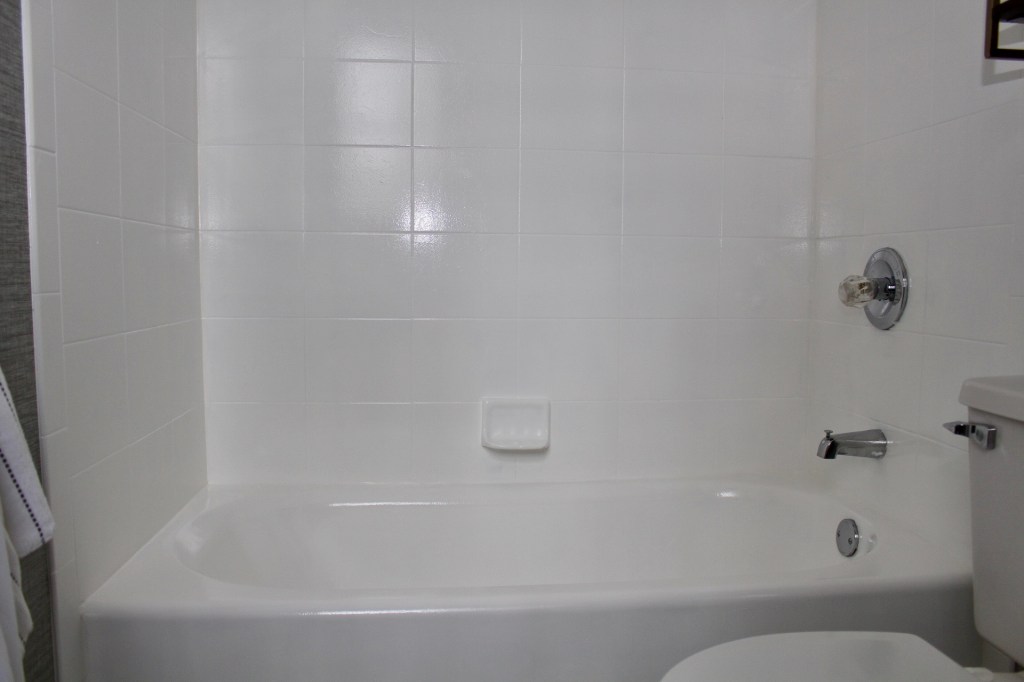
The actual painting part is super easy. If you can paint a wall, you can do this. I was planning on painting the shower tile and the floor tile. But once I did the that, the tub-that-I-thought-was-white…..well, it actually did not look white anymore. It looked so dingy. So I ordered another can of paint to do the tub as well. Not what I was planning, but it ended up really making everything look brand new.
Here are some pictures of the process. Excuse the lighting here, I had to use flash because a lot of my work happens at night when the kiddos are in bed! You can see that a first coat most definitely does not give great coverage. And you can start to see how bad the tub looks as I paint the tile. 
 Then the floor tiles started to go white.
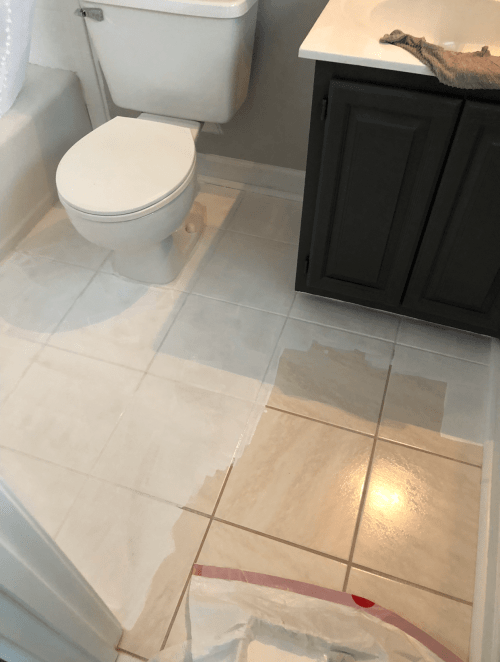
 Then the tub and floor got a second coat.
 I ended up doing a third coat on everything. The paint dries really fast and is ready for the next coat in about an hour. I painted the tub, and then I waited a good 24 hours until everything was totally dry. Then I was able to use white silicone and recaulk everything. It really started to look good after I did that!

 One thing to note: the paint comes in 2 separate containers that need to be mixed together. The directions say once it’s mixed, it needs to be used within 6 hours. So you wanna give yourself a good few hours to do a few coats. Also, directions say after it is all done, give it a few days before using. Luckily no one is in our guest room this week, so that doesn’t affect us, but if this is your main bathroom, you might want to make other arrangements for 2-3 days.
That’s it for the painting part. I really can’t even explain how it has made the bathroom look brand spanking new. Like no one has ever used it before! And like I said, although the tile and floor were not terrible, white is a nice blank slate to do what I want to do in there now. And for those of you with pink, green, or orange bathroom tile, GO TO AMAZON IMMEDIATELY and order this paint! Look at the difference!
Stay tuned — tomorrow I’ll share about stenciling the tile!

Leave a comment